


 Print This Post
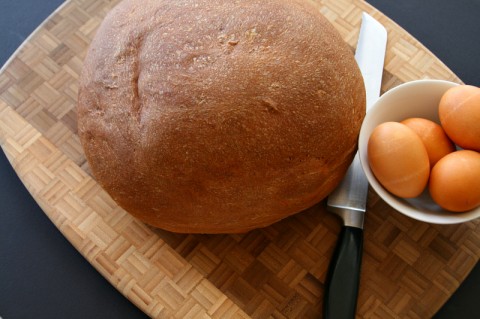
Am I allowed to say — and will you believe it if I tell you? — that my Grammy Zito made the best Easter bread on the planet?
Soft, warm, fragrant, eggy, wonderful Easter bread, kneaded by hand, lovingly, in her Italian kitchen. We sliced it thin, slathered it thickly with butter (back in the day when we all weren’t afraid of butter!), and ate it for breakfast, lunch and dinner.
It makes wonderful toast, sandwiches and snacks.
 And the recipe, observed and recorded by my mother, now has a permanent home in my recipe box. While I don’t often enough have time to make bread entirely by hand, I still crave the flavor of my grandmother’s bread; Easter Sunday just wouldn’t be the same without it.
So with a little tinkering with ingredient amounts, I can easily make it in my automatic bread machine. I use a modified strategy of letting the machine do the kneading and first rise, and then I take over for the second rise and baking in the oven. But you can certainly do the whole shebang in the machine if you like.
I hope you haul out your bread machine and try it, too. My usual top rating is 5 stars. To this, I give 10 stars!
 Happy Easter!
Recipe: Grammy’s Italian Easter Bread
Summary: Craving the flavor of old-time Italian Easter bread, made the easy way, using the automatic bread machine.
Ingredients
- 1 package (2 1/4 teaspoons) dry yeast (I used SAF-Instant Yeast, so no need to proof or dissolve)
- 3 cups bread flour
- 1/3 cup granulated sugar
- 1/2 teaspoon salt
- 3 eggs
- 1 tablespoon melted butter (I used Kerrygold)
- 1/2 cup milk, scalded and then cooled (may need additional milk; see note below*)
Instructions
- Easiest way: Add ingredients to bread machine in order recommended by manufacturer. Turn machine on (White Bread setting) and let it go! (Check dough consistency early in kneading cycle and add up to 1/4 cup more milk if needed to achieve correct consistency; see note below.) Skip to step #7.
- The Shockingly Delicious usual way: Add ingredients to bread machine in order recommended by manufacturer. Turn machine on to dough setting, and let the bread maker mix, knead and go through the first rise (something like 80 minutes total). (Check dough consistency early in kneading cycle and add up to 1/4 cup more milk if needed to achieve correct consistency. See note below.)
- When it beeps and is done with dough cycle, remove dough, shape in a round, place it on a parchment paper-covered baking sheet, and set in a warm place for the second rise.

- Allow to rise for 30-60 minutes, undisturbed, until it doubles in size.

- Heat oven to 350F degrees, and bake loaf for 30 minutes. The top will be brown and it will sound hollow if you thump the bottom.
- Remove from oven, transfer loaf to a rack and cool completely before cutting. (If you allow it to cool while still on the baking sheet, the condensation from cooling will make the bottom soggy. So move it!)
- Cut and serve with butter (we enjoy Kerrygold unsalted), and enjoy!


Quick notes
Follow the instructions that come with your bread machine. Some makers recommend yeast first, some recommend yeast last, etc. You’ll get the best result if you scan the little pamphlet that came with the machine and heed it.
*Dough consistency
 I made this bread many times before, and 1/2 cup milk was the right amount. The other day I made it and the dough wasn’t holding together correctly, and looked dry to me during the mixing/kneading phase in the bread machine, so I added more milk, a tablespoon at a time, until it looked right (an additional 1/4 cup total). Why did it work some times, and not the other? It could have been that my eggs were old and so were drier and less liquidy. It could have been that this time I made it on a super-dry winter day, so my flour naturally contained less moisture than usual. My point is that you need to peek at the dough while it is kneading, even in an automatic bread maker, and possibly adjust the moisture content of the dough, depending on weather or ingredient factors.
Making it without a bread machine
Preparation time: 10 minutes
Cooking time: about 2 1/2 hours (including mixing, kneading, rising, baking in bread machine)
Diet type: Vegetarian
Number of servings (yield): 12
Culinary tradition: Italian
My rating 10
 Welcome to my kitchen!
At ShockD, you’ll find scrumptious, tried & true, "scary good" recipes, tips and coaching to make YOU a fabulous home cook! Don't blame me if you need a 12-step program to wean yourself away!
E-mail me: Dorothy.Reinhold@gmail.com
Welcome to my kitchen!
At ShockD, you’ll find scrumptious, tried & true, "scary good" recipes, tips and coaching to make YOU a fabulous home cook! Don't blame me if you need a 12-step program to wean yourself away!
E-mail me: Dorothy.Reinhold@gmail.com


{ 32 comments… read them below or add one }
My Family has been making a Very similar recipe for generations. I believe it’s from Naples, Italy originally. My Aunt’s Mother in law brought it over… where she got it, I don’t know… just that it was an old family recipe and it was a Delicious bread that as kids, we couldn’t get enough of.
In recent years, I’ve started making it myself and could eat it every day! Awesome fresh with just butter, As a sandwich (chicken salad), Toasted or even as French Toast All the women in the family would get together a few days before Easter and make about a dozen loaves!
Here’s the recipe… Now it IS a pretty dry dough and is very tough to knead… but the bread has a Unique, crumbly texture. It also gets quite dark if done the way they’ve always done it but I don’t bake it that long…just until internal temp gets to about 190-200F.
I also add a bit more water to make it a bit more workable, but it’s good either way.
I was shocked to find your recipe and to see how similar it is!
I have baked it in a 13 inch pullman pan, a 9 inch loaf pan, 2-3 pound Boulles, etc. always good no matter the shape 🙂
Easter Bread – 325° for 1 hour
for 1 Loaf
1.5 lbs. All Purpose Flour (4.25 Cups)
3 Eggs
2 pkts yeast (or 3 and 3/8 tsp (1/4+1/8) Instant Yeast- no need to dissolve, just add water directly to dough)
4 oz. warm water
3/4 sticks (Unsalted) Sweet Butter – Melted
3/4 Cp Sugar
1.25 tsp Salt
for 4 Loaves
6 lbs All Purpose Flour
12 Eggs
8 pkts Yeast (4.5tbs instant yeast, no need to dissolve just add 8+oz water to dough)
2 – 8oz. bowls of warm water (only to dissolve yeast… see above)
3 sticks (Unsalted) Sweet Butter – Melted
3 Cps Sugar
1.5 Tbs. Salt
Dissolve yeast in warm water (2 bowls for 8pkts, unless you’re not using packets)
Put Flour in large bowl or pot
Make a well or depression in center
Add all ingredients into well (including melted butter and dissolved yeast)
Knead Dough very well for 1/2 an hour! I do it until I get a good “window”
Place Back in Bowl, Cover with towel and set in warm place to rise to double in size. Could take 1 hour or even up to 5-6 hours depending on temperature
Knock down the dough and set it aside to rise back up to previous size again (or close)
Split loaves into 4 (for 4 loaf recipe),
Form into round balls/Loaf shapes
Place on Greased and Floured Cookie sheet and rest for 1 hour or I take it out when internal temperature reaches at least 180 degrees. IT does get dark, so don’t get worried if you see that.
The smaller I make the loaf, the less time It needs to bake.
Last night I made it into a 9″ sandwich loaf
Bake at 325° for 1 hour
Paul,
Thank you for sharing your heritage recipes! I wish I knew more about what part of Italy my mother’s family was from. Sadly, that info wasn’t passed down effectively. I am now motivated to see if I can find out!
Hi Dorothy, I tried your recipe yesterday and we loved the our Easter Italian buns. I have blogged about it today and linked to your post for the recipe. thanks for posting. have a great day !
following you in FB now.
http://myniche-myspace.blogspot.com/2013/03/delicious-italian-easter-breads.html
Tanusree,
I love your interpretation with the braids. They look so pretty photographed in black and white, too. Well done!
Oh, love is definitely the secret ingredient! Did she ever make it into a basket with colored Easter eggs?
Fran,
No, but that is a really cute idea!
Great bread and great recipe.
I agree with you. Bread aroma around home is so amazing, it’s poetic, tempting. It give a real flavour of home.
Thanks Dorothy for sharing the recipe. Qtn of the day: possible to get as good a result if we use whole grain flour such as spelt? What is your intuition on this? Lots of butter when having the bread by slice, YES!
Yee,
I have not baked with spelt flour yet, so I truly don’t know! I do know you could add probably sub up to half of the flour as white whole wheat (King Arthur makes a version of this), and it will be fine.
I’m still unafraid of butter! GREG
Greg,
Yay!
An eggy bread with butter sounds like pure heaven! Many thanks to your Grammy for passing this one down through the generations.
I’m telling you, Grandmother’s are the best! I think its something in their hands. This is a beautiful bread!
Your bread looks phenomenal!! I can tell just by the pictures that it’s the perfect consistency and texture. I can almost smell it from here 🙂
Renee,
Oh yeah…you can smell this one, and you want it!
Dorothy,
What simple ingredients (and a simple technique–I’ve even started mimicking my bread machine by temporarily cranking up the speed on my stand mixer while making pizza dough–is that weird?) and what a lovely looking loaf.
Thanks to you and your Grammy.
Your grandma sounds a lot like mine! What a beautiful bread…and I love the idea of using the bread machine – that makes the whole operation seem a lot more do-able. Yum!
Any chance you’d share the non bread machine version of your recipe? I love to make bread and don’t have a machine. Thanks! It sounds delicious – I know my girls will love it!
I second Amy’s request.
It’s wonderful that you got the shape of the bread in such an even round ball. Any tips on shaping, or was it simply that the dough was firm and therefore easy to shape?
Faye,
It is a firm dough, and so I just shaped it in a round, plopped it on the parchment-lined baking sheet, and stuck it in a barely warm oven to rise. By barely warm, I mean I turned the oven on for 10-15 SECONDS, turned it off, and then put the bread in there to rise. (Put your hand in the oven to test…it should feel just slightly warmer than the air in the kitchen. It should not be hot or you will prematurely kill your yeast and bake the bread.) My kitchen was drafty that day, so I wanted a warm environment for the rise. I added some rudimentary directions on doing it all by hand to the recipe. Cheerio, and hope that helps!
Thanks so much, Dorothy. I often put breads to rise in the turned-off oven too. I guess my question about making it by hand was more about the proportions of the ingredients when you make the bread by hand, because you mentioned you did a little tinkering to get the recipe to work in the bread machine.
Faye,
I adjusted the proportions to make it fit into the bread machine, since the bread machine only can take 3 cups of flour. So everything is scaled slightly down.
Your bread is beautiful– especially the photos of it in the rising stages. Making bread at home is such a special process and I am happy to bake along with you this month. Thanks for sharing this family memory.
Brava, Dorothy! Looks good!
If this was your grammy Zito’s tried and true recipe…I have to try it. It looks amazing, Dorothy. The weather does have an impact. Each time I make a dough it is a little different. This is perfect for March #TwelveLoaves!
Dorothy!
I love this bread! It’s so pretty and perfect! Love that you made your Grammy’s bread. . and I totally agree, “back in the day when we all weren’t afraid of butter!”. . Like Julia, we need to use butter and not be afraid of it!!! Esp when it comes to baking bread like this! wow, you only had to use 1 tablespoon?
Alice,
1 tablespoon in the bread, but then we like to put a THICK coating on each piece when it is cut!
Would love to see the original recipe as I don’t own a bread machine!
The caption in your photo says it all “flour, eggs, butter, and love” and love being the most important ingredient. Anything made with love is the absolute most precious gift of all.
Renee,
Agreed!
I believe this bread is good year round! Barely sweet, just wonderful for sandwiches Dorothy!
Your bread looks amazing! I miss making regular bread, especially after seeing this. I love recipes that have been handed down from generation to generation, it keeps us all connected. Enjoy your day!