


 Print This Post
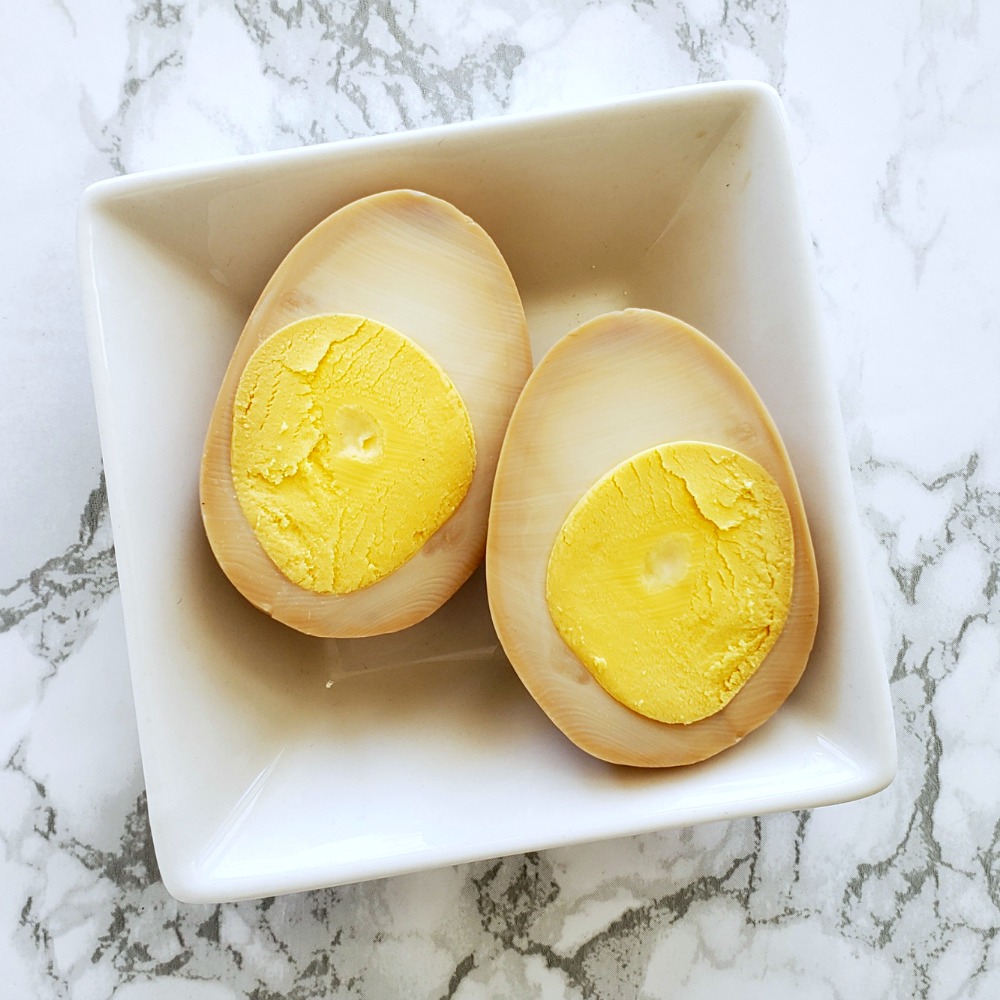
Hard-boiled eggs can seem ho-hum, until you brine them in a seasoned soy sauce mixture, which adds salt, a sweet note, tang from vinegar and a touch of intrigue from aromatics. Soy-Brined Hard-Boiled Eggs will be your new go-to, and should impress your brunchers!
How to make Soy-Brined Hard-Boiled Eggs
It’s so, so easy to make soy sauce eggs. They’re also known as shoyu tamago.
Hard cook 6 or so large eggs. You can use my fool-proof stovetop recipe here, which should give you a nice egg without that green ring around the yolk.
 Mix up the brine.
 Peel the eggs and add them to the brine.
Allow those eggs to bathe in that brine for 6 hours, or up to a day (my preference). (In truth, I have left them there for days and days, but I must say I think it makes the whites a bit tougher. While this doesn’t bother me, it may not be a desired texture for everyone, so fair warning.)
How to use Soy-Brined Hard-Boiled Eggs
 1. Simply eat out of hand as a protein snack. Again, it is only fair to warn you…you will reach for one, and then invariably you’ll have another, so make more of these than you think you’ll need.
2. Slice and put on your avocado toast (yes, try it!), or use as the protein component in a salad that doesn’t seem like it’s filling enough, or on your ramen noodle bowl.
3. Devil them, or use in your egg salad.
 4. Make what I call your own individual brunch board or lunch board, as I show above. Egg, sliced cheese, cut or sectioned fruit…anything goes!

Soy-Brined Hard-Boiled Eggs take the ho-hum out of classic HBs and will be your new go-to for brunch. Brine them in a seasoned soy sauce mixture, which adds salt, a sweet note, a tang from vinegar and a touch of intrigue from aromatics.
Ingredients
- 6 tablespoons water
- 1 tablespoon sugar
- 2 tablespoons rice vinegar
- 2/3 cup low-sodium soy sauce
- 1/4 teaspoon ground ginger (or use a "coin" slice of fresh ginger if you have fresh)
- 1 scallion, both white and green part chopped (optional)
- 1 small clove garlic, halved (optional)
- 6 hard-boiled eggs (see this fool-proof method)
Directions
- First, find a jar that will fit all 6 eggs. Remove eggs from jar and make the brine right in the jar.
- Add water, sugar, vinegar, soy sauce and ginger to the jar, and stir until the sugar is dissolved. Add scallions and garlic if you are using. Submerge peeled, hard-boiled eggs in the liquid, which should completely cover the eggs. I found that a more narrow jar worked best; a wide jar allowed the eggs to float loose and the eggs on top remained out of the liquid, so a narrower jar solved that.
- Put the lid on the jar and refrigerate for at least 6 hours; I prefer to refrigerate for a day, but suit yourself. Remove the eggs from the solution, which can be saved in the refrigerator and reused for another batch of eggs if you like. refrigerate the brined eggs in a tightly sealed container; they will last a couple of weeks, if you don't eat them immediately. I found them impossible to resist for snacks and meal components.
- To serve, cut the eggs in half lengthwise, so you can see the golden yolk and the browned edges from the soy brine.
- Makes 6 eggs.
Notes
Recipe source: Slightly adapted from "Milk Bar Life," by Christina Tosi, and made famous at Momofuku restaurant.
 Pin the image below for Soy-Brined Hard-Boiled Eggs to your Pinterest board to save this recipe

Thanks for visiting…are you hungry for more? Follow Shockingly Delicious on…
FACEBOOK | PINTEREST | INSTAGRAM | TWITTER
…for all the latest recipes, ideas and updates!
This post may contain affiliate/referral links. It is a way for this site to earn advertising fees (at no cost to you) by advertising or linking to certain products and/or services that I approve and prefer. Thank you for using my affiliate link to shop, so I can continue to bring you shockingly delicious recipes!
 Welcome to my kitchen!
At ShockD, you’ll find scrumptious, tried & true, "scary good" recipes, tips and coaching to make YOU a fabulous home cook! Don't blame me if you need a 12-step program to wean yourself away!
E-mail me: Dorothy.Reinhold@gmail.com
Welcome to my kitchen!
At ShockD, you’ll find scrumptious, tried & true, "scary good" recipes, tips and coaching to make YOU a fabulous home cook! Don't blame me if you need a 12-step program to wean yourself away!
E-mail me: Dorothy.Reinhold@gmail.com


{ 22 comments… read them below or add one }
Can you save and reuse the brine or do you toss it out after you pull out the eggs?
Elizabeth,
I re-used the brine twice more. It ended up with eggs that were not quite as deeply flavored as the first use of the brine, but still fine, to my taste! Waste not, want not works for me!
Now this I’m going to try – thanks!
I have never heard of this but can’t wait to try it out!
These are mouth watering! I love these so much!!!
I have to give these a try! Love this recipe!
I have never thought to make hard boiled eggs this way! Love the salty flavor!
Beth,
It really does work with the egg!
Deviled eggs can definitely get boring. I’ve never tried them like this before, I’ll have to give it a shot!
Shannon,
Yep, these are anything but boring!
I’ve never brined hard-boiled eggs before and now I’m so curious to try it!!
What an interesting find, I’ve never thought of trying this before, will have to give this ago!
These are absolutely phenomenal! This is quite possibly my new favorite egg dish, and it’s so simple—the hardest part is waiting!
Bee,
Agreed! I am ready for them when I get the thought to make them!
wow thats something new.. have to try it.thanks
wow! This is such a brilliant idea! So great for an appetizer or a quick dinner!
Yum! What a great idea, and nice idea to spruce up the traditional hard boiled egg recipe. I usually stick with a variety, some sweet, some savory!
Such basic recipes but amazing taste. Ah, one more idea for soy brined hard boiled eggs like Asia style: you can eat with white rice and a little pickle. It will be a tasty mixture in the summer dinner. Let’s try it.
Lawrence,
I like that idea with the white rice and pickle. I will try it!
I’ve never tried these before but they look so good! Can’t wait to make a batch!
I love everything about brunch. From the food selections to the brunchy drinks – brunch is my favorite meal!
This adds such a great flavor twist to a classic brunch dish. What a great idea!